
Filmora 16 Color Mask: A Simpler Way to Make Selective Color Adjustments
Global color correction affects the entire image, which can become limiting when different areas need separate fixes. Brightening a face in shadow may also make an already bright sky look more exposed. Reducing highlights can then affect the subject again, forcing editors to balance competing areas within the same shot.
Wondershare Filmora 16 addresses that problem with Color Mask for targeted adjustments in an area. Instead of changing the whole frame, editors can isolate the region and adjust it separately. Selective grading becomes practical when exposure, color, or contrast problems affect part of the image.
Part 1. What Is a Color Mask?
A Color Mask lets you apply targeted color adjustments to selected parts of a frame. Instead of changing the whole image, you can isolate a region with a mask and refine its color separately. Filmora supports several mask types, including shapes, custom paths, and AI-assisted selections.
The workflow is easier to follow when you treat adjustment and masking as 2 separate decisions. First, create the color change you want. Then define where that correction should appear, using the mask controls to limit its reach.
Step 1. Create a Grading Layer
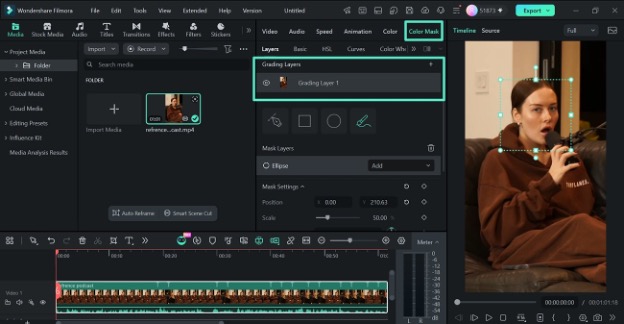
Click the clip you want to grade, then open the “Color Mask” tab. Under Layers, click “Add Grading Layer,” which creates a separate layer to hold the color work. You can add multiple layers to a single clip, which is how a face and a sky are treated independently.
Step 2. Shape the Curve
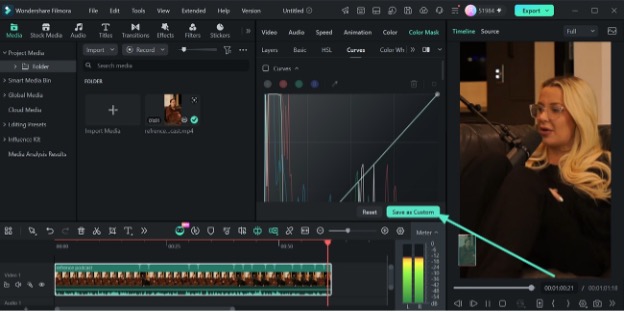
Open the “Curves” section and adjust the curve to change the tonal or color values on that grading layer. The individual color channels are available if the correction needs them. Moreover, “Save as Custom” stores the curve so you can reuse the same setting on later clips.
Step 3. Add a Mask and Refine Its Edge
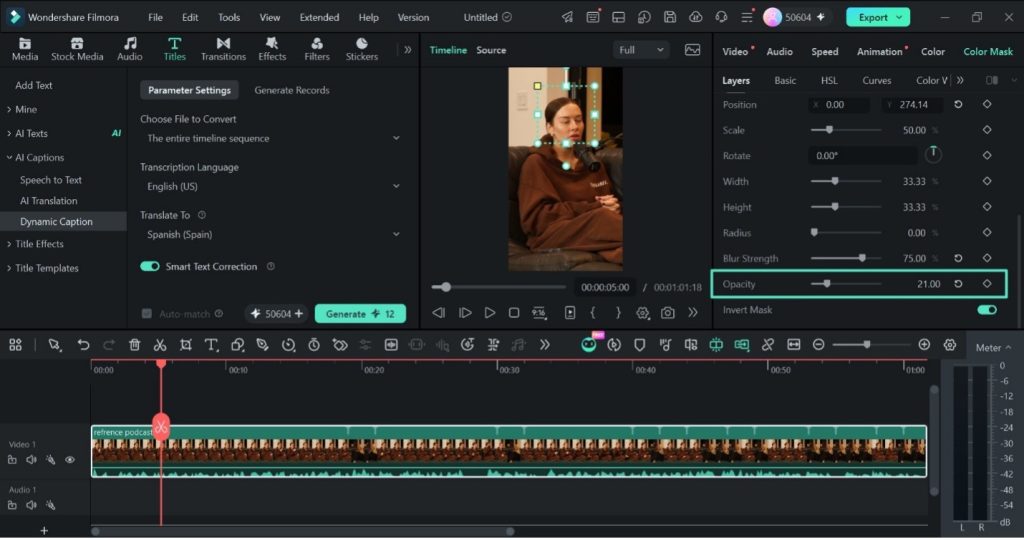
Go back to “Layers” and pick a mask type, either Rectangle, Circle, or the custom drawing option. Mask Settings then control “Position,” “Scale,” “Rotate,” “Width,” “Height,” “Radius,” “Blur Strength,” and “Opacity.” Furthermore, “Invert Mask” flips the selection so the adjustment lands outside the shape.
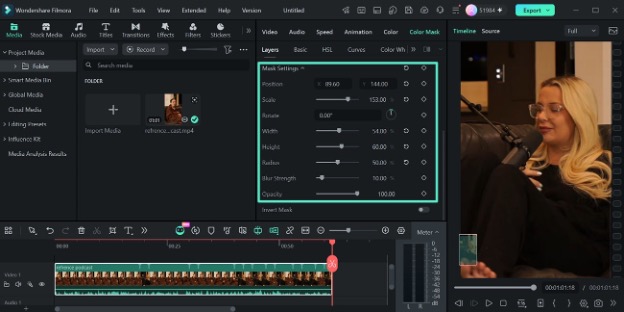
Step 4. Check It Across the Whole Clip
Play the full clip to check how the correction holds over time. Adjust the grading or mask settings where needed, especially if the subject moves. Once the result looks right, click “Export” to save the finished video.
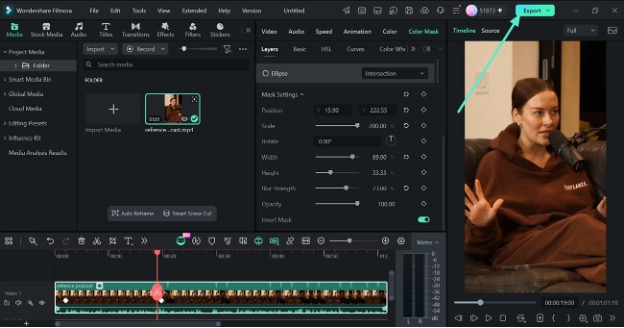
Note: Selective grading often requires masks, layers, or duplicated clips to isolate specific areas of a frame. Color Mask keeps the mask and color adjustments on the same clip, enabling targeted corrections while reducing duplicate tracks and unnecessary timeline complexity.
Part 2. Where Color Mask Improves Color Correction
Different areas within the same shot may require separate color adjustments. In the Filmora video editor, Color Mask isolates these areas so exposure, color, or other grading changes can be applied without affecting the entire frame. Then match the mask shape to the region that needs correction.
| What You Want to Fix | Mask to Use | Suggested Curve Adjustment |
| Face affected by shadow | Soft circular mask around the face | Raise the lower midtones slightly to brighten the face |
| Overexposed or pale sky | Rectangular mask across the sky | Pull down the highlights to recover brightness and detail |
| Product lacking separation | Custom mask around the product | Increase local contrast with a slightly steeper curve |
| Distracting background | Subject mask with Invert Mask enabled | Reduce background contrast with a flatter curve |
Make Selective Corrections Blend Naturally
A well-placed mask defines the correction area, but its settings determine how naturally the adjustment blends with surrounding pixels. The following 5 controls and editing practices help refine mask edges, control correction intensity, and maintain a consistent appearance across the frame:
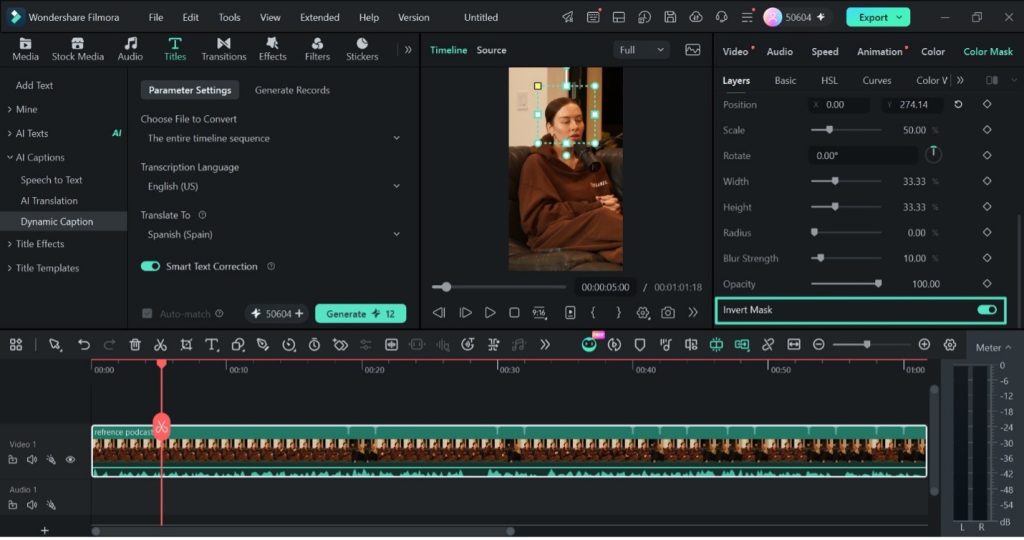
- Treat Everything Outside the Subject: Turn on “Invert Mask” when you want the correction to affect the surrounding area rather than the selected subject. This works well for toning down a bright or distracting background while leaving the main subject unchanged.
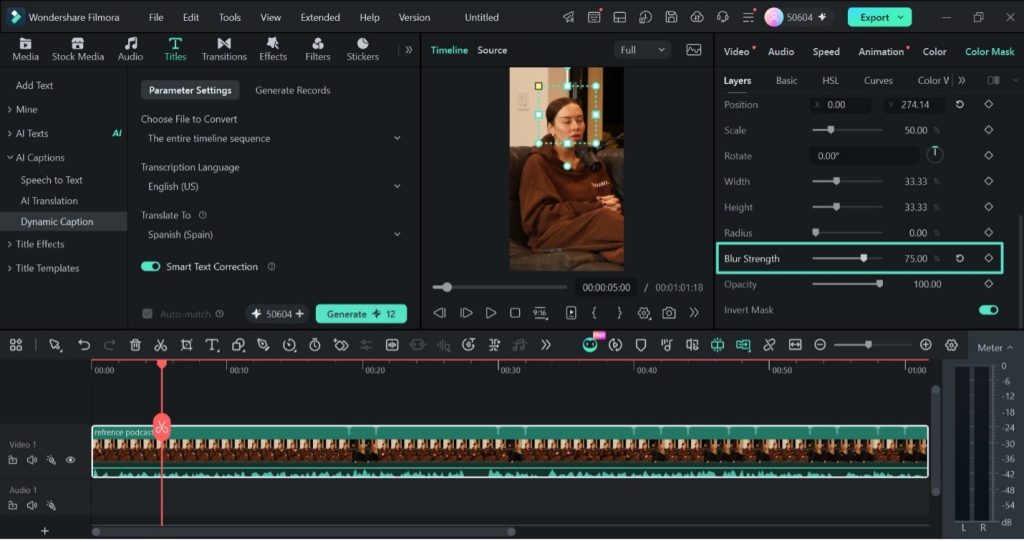
- Soften the Mask Boundary: Increase “Blur Strength” to feather the transition between the corrected and untouched areas. A softer edge helps prevent obvious outlines around faces, products, and other irregular subjects.
- Control the Correction Intensity: Reduce “Opacity” when a local adjustment looks too noticeable compared with the rest of the frame. Lowering can make changes to brightness, contrast, or color blend more naturally with the original shot.
- Finish Global Grading First: the overall exposure, contrast, and color balance close to the intended look before making selective corrections. Otherwise, later changes to the whole image may alter how the masked area fits with its surroundings.
- Check Moving Subjects Carefully: When the subject shifts within the frame, review whether the mask still covers the intended area. Position, scale, rotation, and size controls can help refine its placement, so the correction does not spill onto nearby parts of the shot.
Note: Moving footage may require additional refinement when local corrections no longer align with a subject as it moves across the frame.
Part 3. Selective Color Correction for Mac Video Projects
When comparing Mac video editing software, selective color controls deserve attention alongside formats, exports, and rendering performance. They let editors correct specific areas without changing parts of the frame that already look balanced.
| Content Type | Why Selective Correction Matters |
| YouTube Videos | Faces matter in thumbnails and opening seconds, so selective correction can improve subject visibility without changing the full frame. |
| Vlogs | Mixed indoor and outdoor lighting may require separate adjustments when one global correction does not balance both areas equally. |
| Commercial Content | Brand colors can remain consistent while exposure, contrast, or color is adjusted elsewhere in the frame. |
| Product Videos | Products can stand out more clearly without increasing saturation or contrast across the entire shot. |
Selective correction is useful when exposure, color, or saturation problems affect only one region. In Filmora, Color Mask limits an adjustment to that selected area while leaving correctly balanced parts of the frame largely unchanged. This can help preserve skin tones, product colors, backgrounds, and other important visual details.
For Mac video projects with uneven lighting or mixed color conditions, this local control can make grading more precise. Editors can correct the affected region instead of repeatedly compromising the rest of the image.
Conclusion
Color Mask does not make grading decisions for you, and it cannot fully fix poorly lit footage. Its main benefit is reducing problems caused by global correction. Improving one area no longer needs to negatively affect another. By creating the adjustment first and defining its region afterward, editors can keep corrections targeted. The mask limits each adjustment to the intended area without requiring duplicated clips or extra timeline layers.